Updated with November 6, 2024
Introduction:
- Updating the BIOS does not require complex steps. Simply copy the BIOS file to a USB drive and boot from it.This method is suitable if your computer cannot boot into the system or if you have only installed RAM without an SSD.
- Tools to prepare:A USB drive (8 GB or larger),the BIOS file.
- The method for updating the EC (Embedded Controller) is the same as updating the BIOS, and GEEKOM provides a file that updates both the BIOS and EC simultaneously on their website.
Notice:
- Before updating the BIOS and EC, please back up important data to avoid any unexpected issues during the update process that may cause the machine to fail to boot.
- BIOS and EC are firmware updates, and after updating, the Bitlocker disk encryption feature in Windows 11 may be triggered. You will be prompted to provide the Bitlocker recovery key to access the system lock screen. If you are using Windows 11 and have logged into a Microsoft account, you need to disable BitLocker before updating the BIOS to avoid triggering BitLocker’s data protection feature. If triggered, you will not be able to access the system desktop, and the data cannot be recovered; a system reinstallation will be required.
- The tutorial for disabling BitLocker is as follows:https://service.geekompc.com/faq/how-to-close-bitloker-or-restore-bitloker-key/
- During the update process, do not force shutdown, disconnect power, or remove the USB drive, as this may lead to a permanent black screen.
Video Tutorial:
- The video introduces two BIOS update methods. It is recommended to follow Method 2 (Starts at 1 min 13 sec in the video). Due to stricter security restrictions from Windows system updates, Method 1 is no longer applicable. We apologize for any inconvenience.
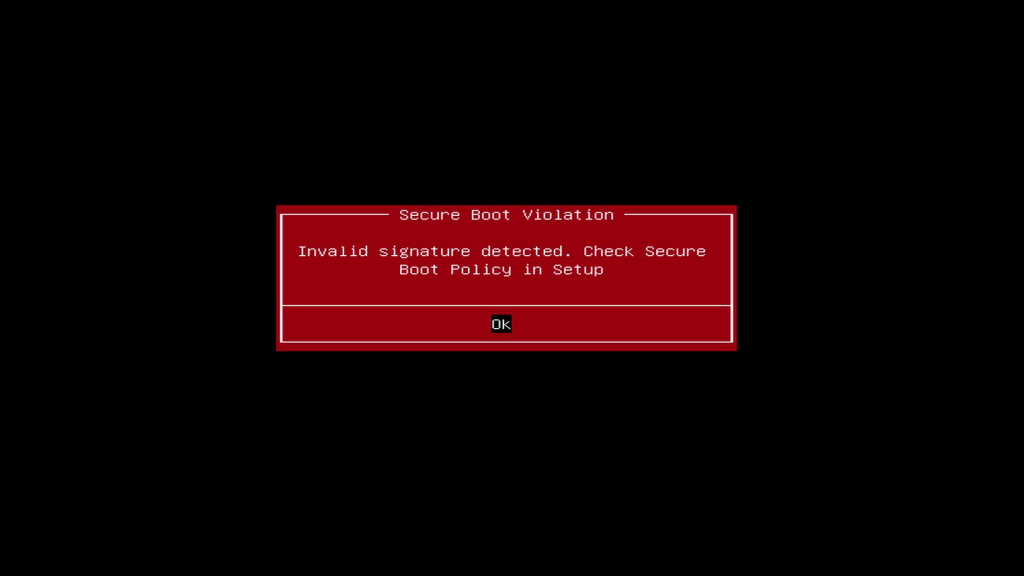
- The SecureBoot option can prevent the device from directly accessing boot programs on a USB drive. Especially when reinstalling the system or updating the BIOS/EC version, it is necessary to disable the SecureBoot option in the BIOS in advance, and re-enable it after the update is complete.
- If you have not disabled the Secure Boot option in the BIOS menu, you may see the following prompt after selecting the USB drive to boot:
Secure Boot Disable Video Tutorial,Press the Del or F7 key repeatedly during startup or reboot to enter the BIOS menu:
Text Toturial
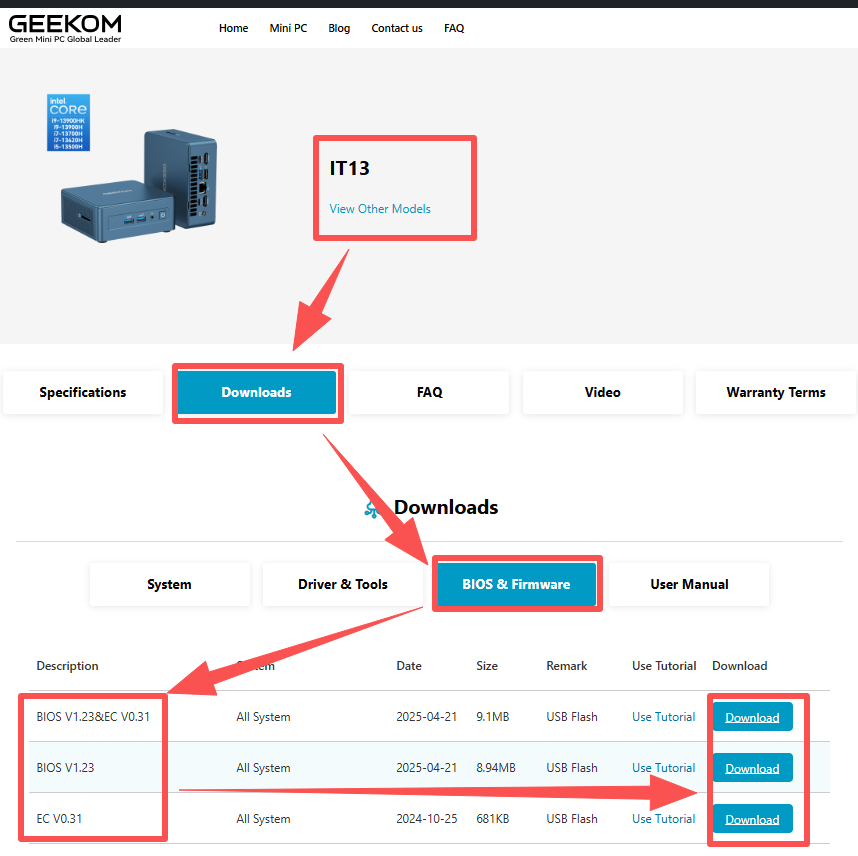
1.Determine Your BIOS and EC Versions(Preparation,2min):
View in Windows System
- On the desktop, press the “Win + R” keys simultaneously.
- Type “msinfo32” in the pop-up input box, and click OK.
- Then, check the BIOS and EC version in the displayed system information panel.
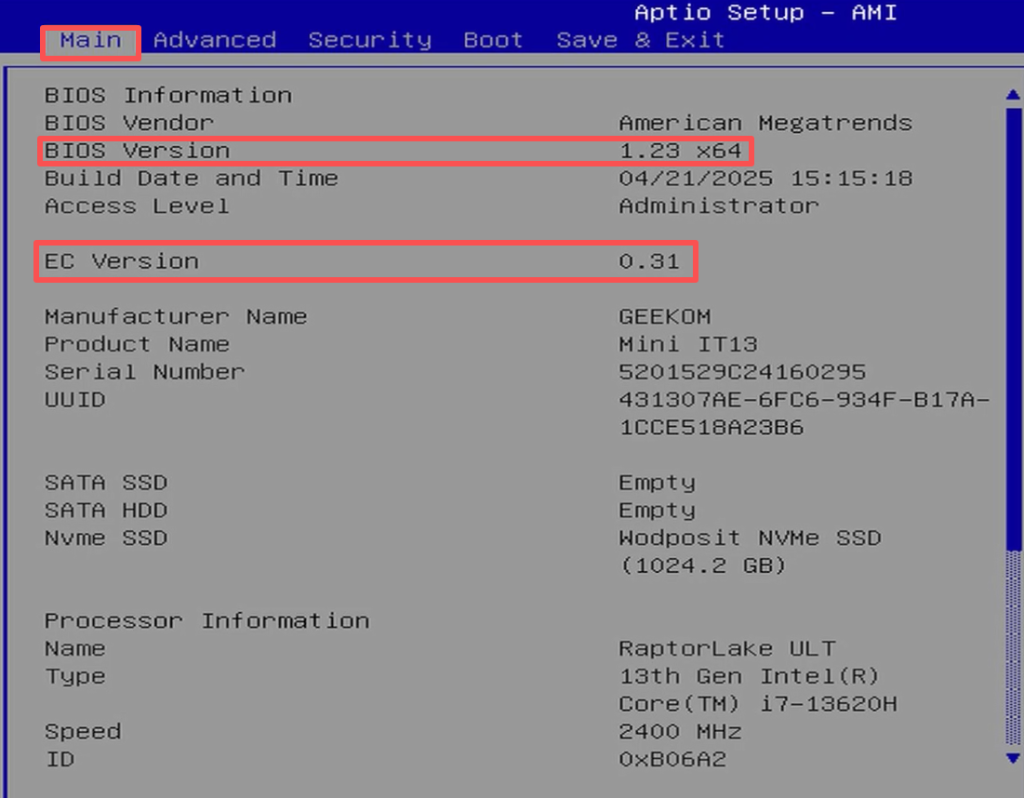
View in BIOS Menu
- Press the Del or ESC key repeatedly during startup or reboot to enter the BIOS menu.
- The BIOS version and EC version are displayed by default on the main page of the BIOS menu.
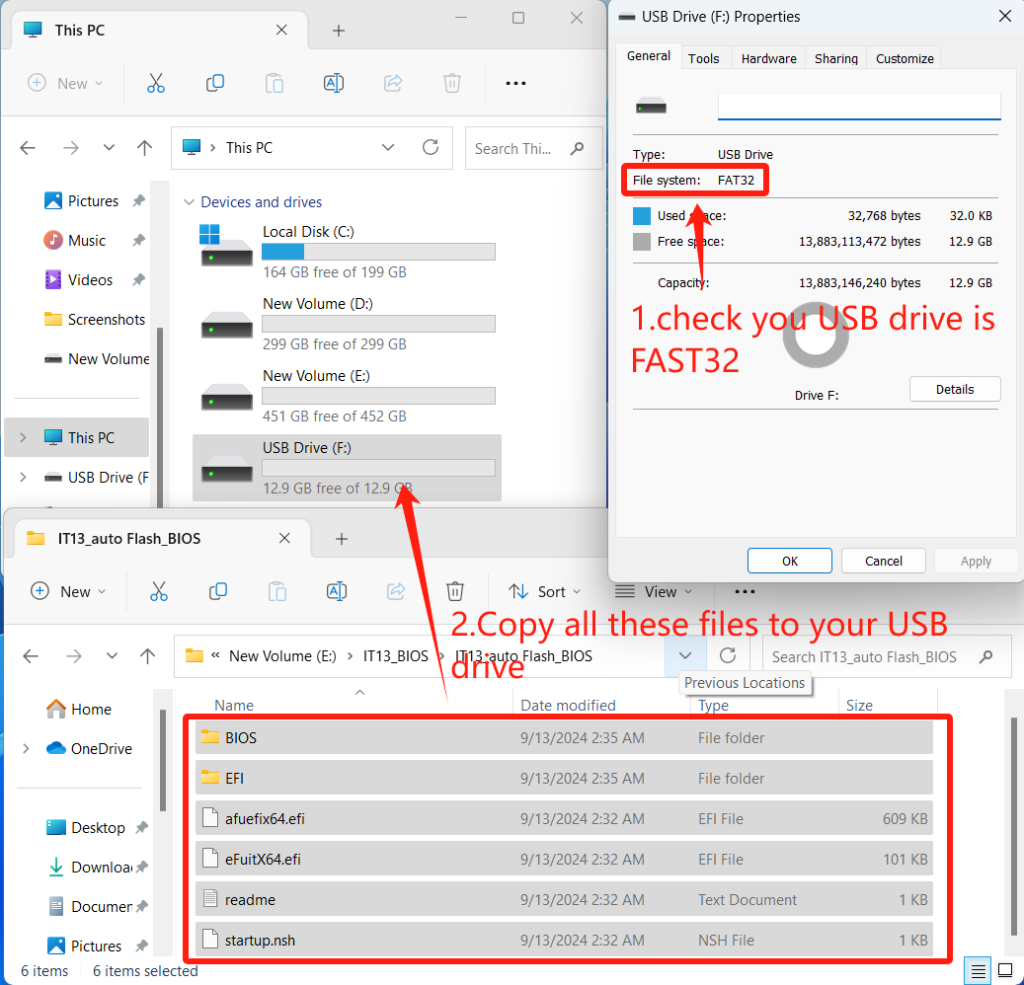
2.Create a BIOS Update USB Drive.(Preparation,3min)
- Prepare an empty USB drive formatted to FAT32 (if not, right-click the USB drive and format it to this format).
- Copy the extracted BIOS files to the root directory of the USB drive (do not copy the entire folder, just the files inside), as shown below.
3.Disable SecureBoot(Preparation,1min)
- Access BIOS/UEFI Setup
- Restart your computer.
- As soon as the system powers on, repeatedly press the Delete (Del) or ESC key to enter BIOS.
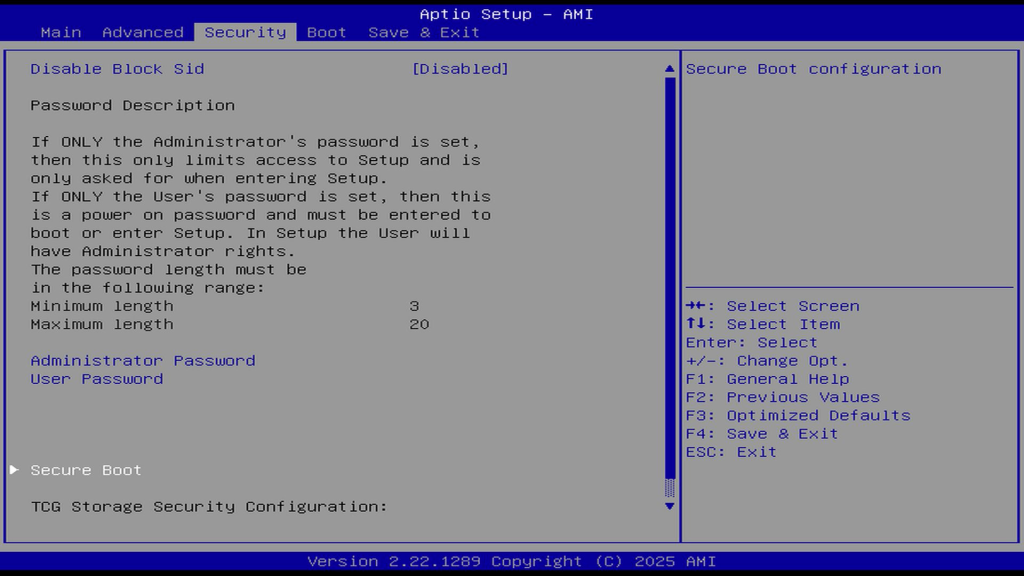
- Navigate to Secure Boot Settings
- Use the arrow keys to go to the Security or Boot tab.
- Locate the Secure Boot option.
- Disable Secure Boot
- Select Secure Boot and change it from Enabled to Disabled.
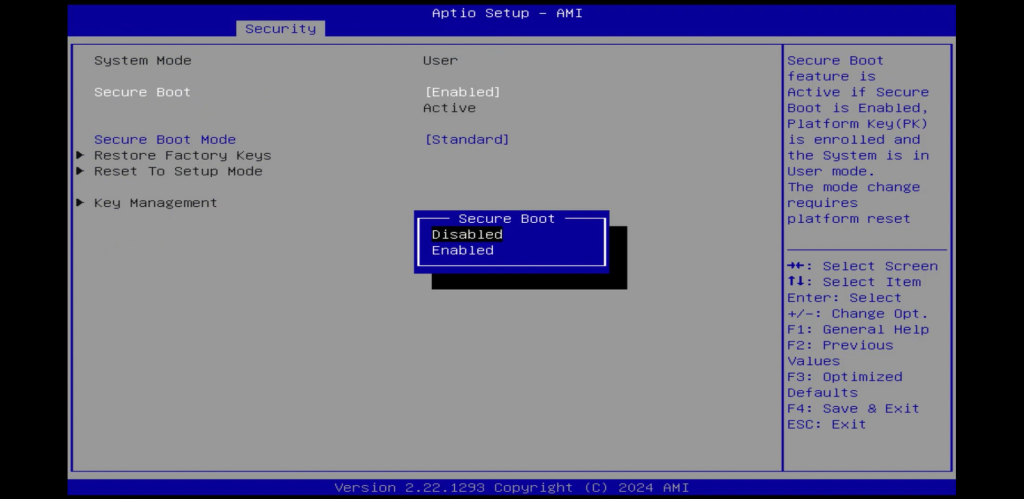
- Disable Secure
- Select Secure Boot and change it from Enabled to Disabled.

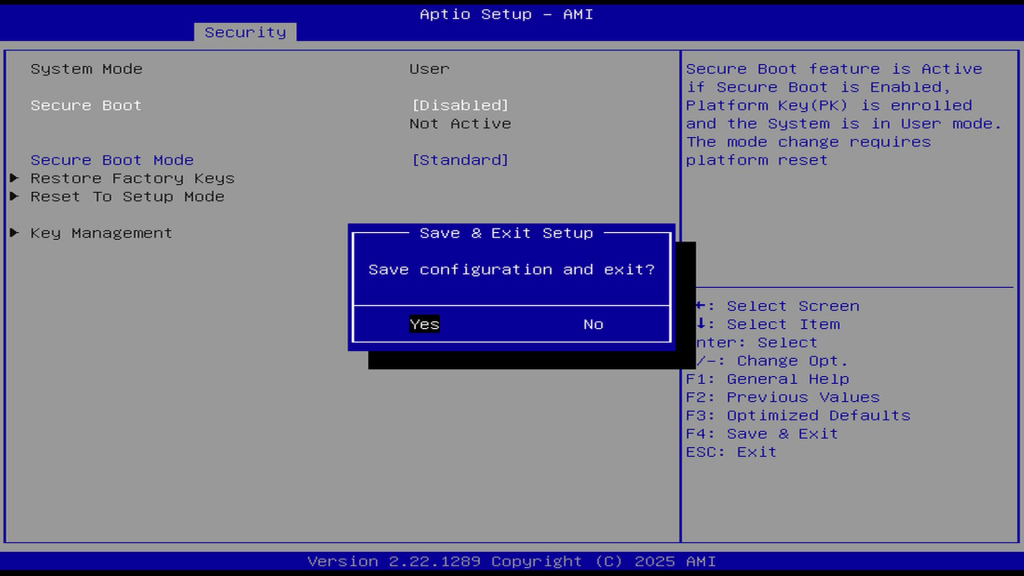
- Save & Exit
- Press F4 (or select Save & Exit Setup).Confirm with Yes to apply changes.
4.Launch the update program from the USB drive.(Key Steps,5min)
- 1.Insert the USB drive.
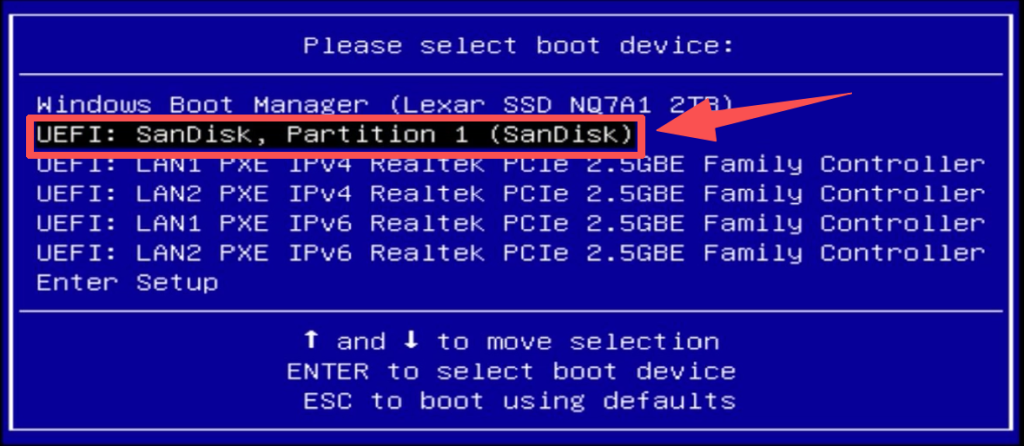
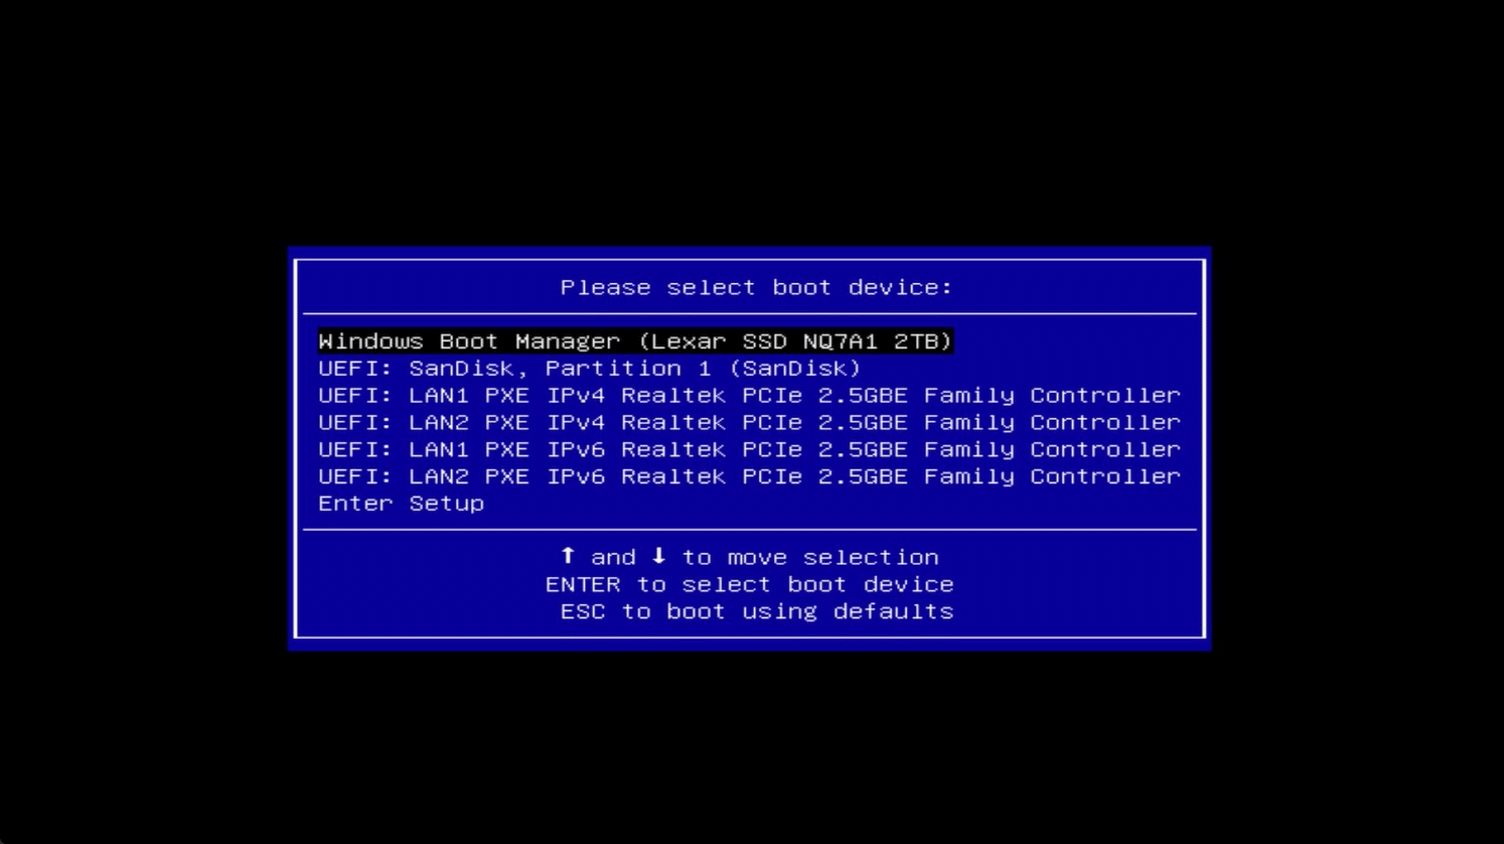
- 2.When the device is powered on or rebooted, repeatedly press the F7 key to enter the boot device selection interface.
- 3.Use the arrow keys to select the inserted USB drive, then press Enter to boot.

- 4.Wait a few seconds for the device to load the BIOS update program from the USB drive.If the BIOS update interface does not appear, it may indicate that the device is having trouble reading files from the USB drive. This could be due to either the BIOS file being in the wrong location on the USB drive or the USB drive not being formatted as FAT32.
- 5.Wait for the BIOS update to complete. The device will restart automatically. If it does not restart, ensure the device is fully powered off (power indicator is off), then press the power button to turn it on.
- 6.After the device starts normally, check the BIOS or EC version again to see if it has changed. If there is a change, it indicates that the update was successful.
Possible reasons for failure
If you fail to update or install BIOS and EC normally, please check the following content
Thank you for watching. If there are any mistakes, your corrections are welcome.